JavaScript Event Delegation is a technique you may have heard of. It’s a different way of using event handlers that offers clear benefits and is becoming more popular amongst web developers. I’ll give a brief overview of event delegation in JavaScript, along with why you should consider it. Note that this tutorial will use the great jQuery library for most examples.
Delegation
Delegation is a fairly well-known design pattern. In short, it is a way for a method to produce its result simply by calling a method on another object, thus delegating responsibility to that object to provide the functionality needed by the method. For example, a Cashier object could store a delegate object called Calculator. Calling Cashier.addToTotal(value) would simply delegate to the contained object, calling Calculator.addToTotal(value).
How is delegation different than inheritance? With inheritance, the subclass inherits all of the functionality/behavior of the parent class. You may not want or need this; in the preceding example, it would not make sense to have Cashier extend from Calculator simply because we wanted the addToTotal() behavior/functionality. Delegation allows the behavior advertised by a certain object/class to be provided by another.
Traditional Event Handling
In order to understand event delegation in JavaScript, we should first look briefly at how events are handled traditionally. When I talk of traditional event handling, I am referring to the model that most will know. In this model, functions are individually bound to events of certain elements. For example, to make all links turn bold upon clicking them (and prevent them from being followed), we could use some JavaScript like this:
window.onload = function() {

links = document.getElementsByTagName('a');

for (var i = 0; i < links.length; ++i) {

links[i].onclick = makeBold;

}

}

function makeBold() {

this.style.fontWeight = 'bold';

return false;

}
The key point with this example is that the function makeBold(), our event handler, is bound to each and every a element. From a resource point of view, this is may be a bad thing because the more event handlers that are attached, the more memory that is used, in general.
Of course, I promised I’d be using jQuery, and doing so cleans up the above code substantially, as well as making it cross-browser compatible: (Besides adding a ton of other abilities and making life easier)
jQuery(function() {

jQuery('a').click(makeBold);

});

function makeBold(e) {

e.preventDefault();

jQuery(this).css('font-weight', 'bold');

}
While this code is cleaner, it still does basically the same thing as above, that is, the event handler function makeBold() is bound to each matched element, that is, each a element.
As a final note, don’t confuse my use of the term traditional with excellent guide to JavaScript event registration, where he uses the term traditional to refer to one method of event registration, distinct from inline registration and the later W3C and Microsoft “Advanced” event registration models.
Event handling using delegation
By contrast, event delegation uses a single (or comparatively few) event handlers to implement the behavior required. This takes advantage of two key features of JavaScript events, namely event bubbling and the target event.
Event bubbling is a model for how events take place on the page. It grew out of a need to resolve the order in which events were triggered on ancestor and descendant elements. For example, assume that I have two event handlers, one attached to the “click” event of a div and another attached to the “click” event of an a element within that div. If I click the a element, which event fires first? Event bubbling is one way to solve that question: It states that the event on the inner element happens first, and then the event “bubbles” upwards to trigger events on ancestor or container elements. There is another opposing model that works in the opposite way, but bubbling seems to be better supported and is more relevant for this article.
Here’s a crude diagram of event bubbling, using a pseudo – box model of sorts:
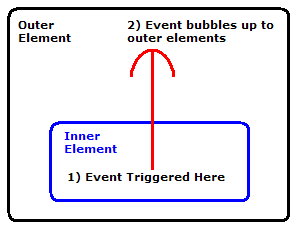
Event bubbling diagram
The event target is the DOM element that issued the event, or the originating element. This is why I believe it’s a confusing term, since it would make more sense to called it the event source. But I digress. The event object, passed to an event handler as an argument (or available via window.event, though jQuery normalizes this) contains a property, event.target, that allows you to get the reference to the “target” element that the event started bubbling up from.
How it’s implemented
All of this is typically accomplished by registering a single event handler to a “container” element that holds all of the elements we wish to react to events for. When an event is triggered on one of the inner elements, it “bubbles up” to the container element, where it triggers the event handler function. From there, we can inspect the source of the event (confusingly called the event target) and then react accordingly.
This is where the delegation aspect comes into play. Since the container element may hold many inner elements, it is unlikely that we would want the same behavior for each element when an event was triggered on it. For example, we might want certain a elements to trigger one action when clicked, while wanting another set of a elements to trigger another action. We’d typically differentiate these links by using separate class names or by context and then attaching event handlers as appropriate.
Using event delegation, process is similar, but instead of attaching multiple event handlers we have one on the overall parent element. When this event handler is triggered, we determine which element triggered the event and then based on this, delegate the remainder of the processing to another function. An example would be helpful now, as our previous examples with making some text bold weren’t too useful. Here’s the XHTML fragment for the container and elements.
<div> <ul> <li> <a href="#">Item A - Click to toggle</a> <ul> <li>Sub-item 1</li> <li>Sub-item 2</li> </ul> </li> <li> <a href="#">Item B - Click to toggle</a> <ul> <li>Sub-item 1</li> <li>Sub-item 2</li> </ul> </li> <li><a href="#">Item C - Click to remove</a></li> <li><a href="#">Item D - Click to remove</a></li> </div>
And here’s the JavaScript:
jQuery(function() {

jQuery('div.container').click(handleEvent);

});

function handleEvent(e) {

// Obtain the source element through event.target.

var target = jQuery(e.target);

// Now decide what to do with it.

if (target.is('a.expandList')) {

// We use Function.call() to set the context for the `this` keyword.

return expandList.call(target, e);

} else if (target.is('a.remove')) {

return remove.call(target, e);

} else {

// Otherwise, allow the default action to take place.

return true;

}

}

function expandList(e) {

e.preventDefault();

// The `this` keyword now references the jQuery object representing the

// target, since that is what we set the context to.

jQuery(this).parent('li').find('ul.hide').slideToggle('fast');

}

function remove(e) {

e.preventDefault();

jQuery(this).parent('li').fadeOut('normal', function(){jQuery(this).remove()});

}
With this example, the steps are clearly outlined. First, we attach the overall event handler to the container element; events that take place on its inner or children element will bubble up to it. When an event is received, we inspect event.target to determine the origin and based on that, “hand off” to another function to carry out the proper behavior.
With some standardization of the CSS class names you use and the associated event handler function names, you can clean up this code to reduce duplication and turn it into a design pattern of sorts.
More advantages of event delegation
Besides potentially using less resources by having less event handlers bound, event delegation brings one other significant advantage: The ability to have event handlers “auto bind” to new DOM elements. For example, let’s say we were to dynamically update the DOM and add more list items to our previous example; this sort of action happens frequently during Ajax operations where you want to present new content to the user.
In the “traditional” event handling model, the new elements would not automatically respond to events as you would like. This is because the events were individually bound to each element. This is a well known problem. However, in event delegation, since there’s only one event handler bound to the container or ancestor element, the newly-created elements will respond to the event properly! This is because an event on them “bubbles” up to the container element just as for the original elements.
Drawbacks of event delegation
I’ve already talked about some of the benefits (fewer bound event handlers, so less resources used and the ability to adapt with DOM changes), but it’s worthwhile to iterate over some of the drawbacks.
- Firstly, not all elements “bubble up” in the way described. The blur, focus, change and submit are notable exceptions so you will not be able to use event delegation with these events in the manner described in this article.
- Furthermore, the code developed to maintain event delegation can be more complicated to understand than with just using the traditional model. Indeed, there is an initial investment time everyone must make to get going. This should obviously be considered since code maintenance is always important.
- Because there’s one event handler being called for all events on inner/descendant elements, there can be some performance implications. If you’re calling expensive functions within this event handler, the event processing could slow down significantly. Careful optimization may be required.